In this article, we will learn how to implement a reactive MVVM architecture in a SwiftUI app. We will use the Clean Architecture recommendations and the single-responsibility principle.
Let’s Start
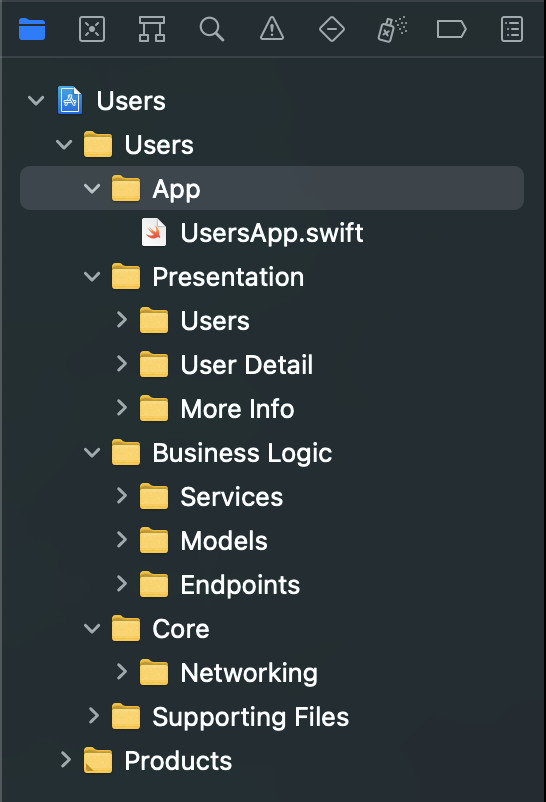
The structure of our project looks as follows:

Here are the components that each module of the Presentation layer contains: - `Configurator`: Creates a `View` and provides it with a `View Model`. - `View`: Passive and doesn’t contain any business logic inside. Its sole responsibility is to display UI elements. - `View Model`: Models the state of the `View` by having `Published` properties and binding them to the data it receives from a `Service`. - `Router`: Responsible for navigation-related tasks. For example, it provides a `NavigationLink` inside a particular view with a destination `View`.
The Business Logic layer consists of these components:
Services: Perform business logic, like obtaining an array of User objects, but don’t contain lower-level implementations likeURLSession. Their goal is to retrieve a particular object aView Modelwants to work with.Models: Objects aServieobtains for aView Model. For example, aCodablestruct.Endpoints: specific REST API endpoints. For example, the Dummy API endpoints for obtaining users.
The Core layer can contain classes responsible for networking and persistence. It also can contain helper extensions.
The idea of Clean Architecture is to have high-level layers always depend on the low-level ones and not the other way around. In our app, the Presentation layer depends on the Business Logic layer, which depends on the Core layer. The Core layer doesn’t know anything about the Business Logic. And Business Logic is completely unaware of Presentation.
Without further ado, let’s dive into the implementation, starting with the low-level layer.
Core
This layer contains the Endpoint struct to be used later in the business logic layer for the creation of specific REST API base URLs and endpoints:
import Foundation

struct Endpoint {
    var path: String
    var queryItems: [URLQueryItem] = []
}
Next, we have a Networker that has the sole responsibility of working with URLSession and returning a Publisher containing simple Data or decoded Codable models:
import Foundation
import Combine

protocol NetworkerProtocol: AnyObject {
    typealias Headers = [String: Any]

    func get<T>(type: T.Type,
                url: URL,
                headers: Headers) -> AnyPublisher<T, Error> where T: Decodable

    func getData(url: URL, headers: Headers) -> AnyPublisher<Data, URLError>
}

final class Networker: NetworkerProtocol {

    func get<T>(type: T.Type,
                url: URL,
                headers: Headers) -> AnyPublisher<T, Error> where T : Decodable {

        var urlRequest = URLRequest(url: url)

        headers.forEach { key, value in
            if let value = value as? String {
                urlRequest.setValue(value, forHTTPHeaderField: key)
            }
        }

        return URLSession.shared.dataTaskPublisher(for: urlRequest)
            .map(\.data)
            .decode(type: T.self, decoder: JSONDecoder())
            .eraseToAnyPublisher()
    }

    func getData(url: URL, headers: Headers) -> AnyPublisher<Data, URLError> {

        var urlRequest = URLRequest(url: url)

        headers.forEach { key, value in
            if let value = value as? String {
                urlRequest.setValue(value, forHTTPHeaderField: key)
            }
        }

        return URLSession.shared.dataTaskPublisher(for: urlRequest)
            .map(\.data)
            .eraseToAnyPublisher()
    }
}
Business Logic
First, we need to define the Dummy API-specific base URL:
import Foundation

extension Endpoint {
    var url: URL {
        var components = URLComponents()
        components.scheme = "https"
        components.host = "dummyapi.io"
        components.path = "/data/api" + path
        components.queryItems = queryItems

        guard let url = components.url else {
            preconditionFailure("Invalid URL components: \(components)")
        }

        return url
    }

    var headers: [String: Any] {
        return [
            "app-id": "YOUR APP ID HERE"
        ]
    }
}
Note that we need to provide an app ID in the headers property. It can be obtained for free once you register an account on the Dummy API website.
Now we add endpoints for obtaining users and a specific user with the provided ID:
import Foundation

extension Endpoint {

    static var users: Self {
        return Endpoint(path: "/user")
    }

    static func users(count: Int) -> Self {
        return Endpoint(path: "/user", queryItems: [
            URLQueryItem(name: "limit", value: "\(count)")
        ])
    }

    static func user(id: String) -> Self {
        return Endpoint(path: "/user/\(id)")
    }
}
Now it’s time to define the models we will work with in our app. The JSON data returned from the Dummy API looks like this:
{
    "data": [
        {
            "id": "0F8JIqi4zwvb77FGz6Wt",
            "title": "mr",
            "firstName": "Heinz-Georg",
            "lastName": "Fiedler",
            "email": "heinz-georg.fiedler@example.com",
            "picture": "https://randomuser.me/api/portraits/men/81.jpg"
        },
        {
            "id": "0P6E1d4nr0L1ntW8cjGU",
            "title": "miss",
            "firstName": "Katie",
            "lastName": "Hughes",
            "email": "katie.hughes@example.com",
            "picture": "https://randomuser.me/api/portraits/women/74.jpg"
        }
    ]
}
So we define the Users and User models like this:
import Foundation

struct Users: Codable {
    let data: [User]
}
import Foundation

struct User: Codable, Identifiable {
    let id: String?
    let title: String?
    let firstName: String
    let lastName: String
    let email: String
    let dateOfBirth: String?
    let registerDate: String?
    let phone: String?
    let picture: String?
}

extension User {
    static func fake() -> Self {
        return User(id: "123",
                    title: "Test",
                    firstName: "First Name",
                    lastName: "Last Name",
                    email: "test@gmail.com",
                    dateOfBirth: "1/1/1990",
                    registerDate: "1/1/2020",
                    phone: "+123456",
                    picture: nil)
    }
}
I have provided an extension to generate a fake User. We will use it in our SwiftUI previews later on.
With Models done, it’s time to create our Services. The first one we need to create is responsible for obtaining an array of users and a specific user with the provided id:
import Foundation
import Combine

protocol UsersServiceProtocol: AnyObject {
    var networker: NetworkerProtocol { get }

    func getUsers() -> AnyPublisher<Users, Error>
    func getUsers(count: Int) -> AnyPublisher<Users, Error>
    func getUser(id: String) -> AnyPublisher<User, Error>
}

final class UsersService: UsersServiceProtocol {

    let networker: NetworkerProtocol

    init(networker: NetworkerProtocol = Networker()) {
        self.networker = networker
    }

    func getUsers() -> AnyPublisher<Users, Error> {
        let endpoint = Endpoint.users

        return networker.get(type: Users.self,
                             url: endpoint.url,
                             headers: endpoint.headers)
    }

    func getUsers(count: Int) -> AnyPublisher<Users, Error> {
        let endpoint = Endpoint.users(count: count)

        return networker.get(type: Users.self,
                             url: endpoint.url,
                             headers: endpoint.headers)
    }

    func getUser(id: String) -> AnyPublisher<User, Error> {
        let endpoint = Endpoint.user(id: id)

        return networker.get(type: User.self,
                             url: endpoint.url,
                             headers: endpoint.headers)
    }
}
As we can see, the UsersService depends on the Networker component, a part of the previously defined Core layer.
Now let’s add a similar Service for obtaining a specific user’s picture:
import Foundation
import Combine

protocol UserPictureServiceProtocol: AnyObject {
    var networker: NetworkerProtocol { get }

    func getUserAvatarData(urlString: String) -> AnyPublisher<Data, Error>
}

final class UserPictureService: UserPictureServiceProtocol {
    let networker: NetworkerProtocol

    init(networker: NetworkerProtocol = Networker()) {
        self.networker = networker
    }

    enum UserPictureError: Error {
        case dataInvalid
    }

    func getUserAvatarData(urlString: String) -> AnyPublisher<Data, Error> {
        guard let url = URL(string: urlString) else {
            return Fail<Data, Error>(error: NetworkError.invalidURL).eraseToAnyPublisher()
        }

        return networker.getData(url: url, headers: [:])
            .mapError { _ in UserPictureError.dataInvalid }
            .eraseToAnyPublisher()
    }
}
We have finished with the Business Logic layer. Now we can finally work on the Presentation.
Presentation
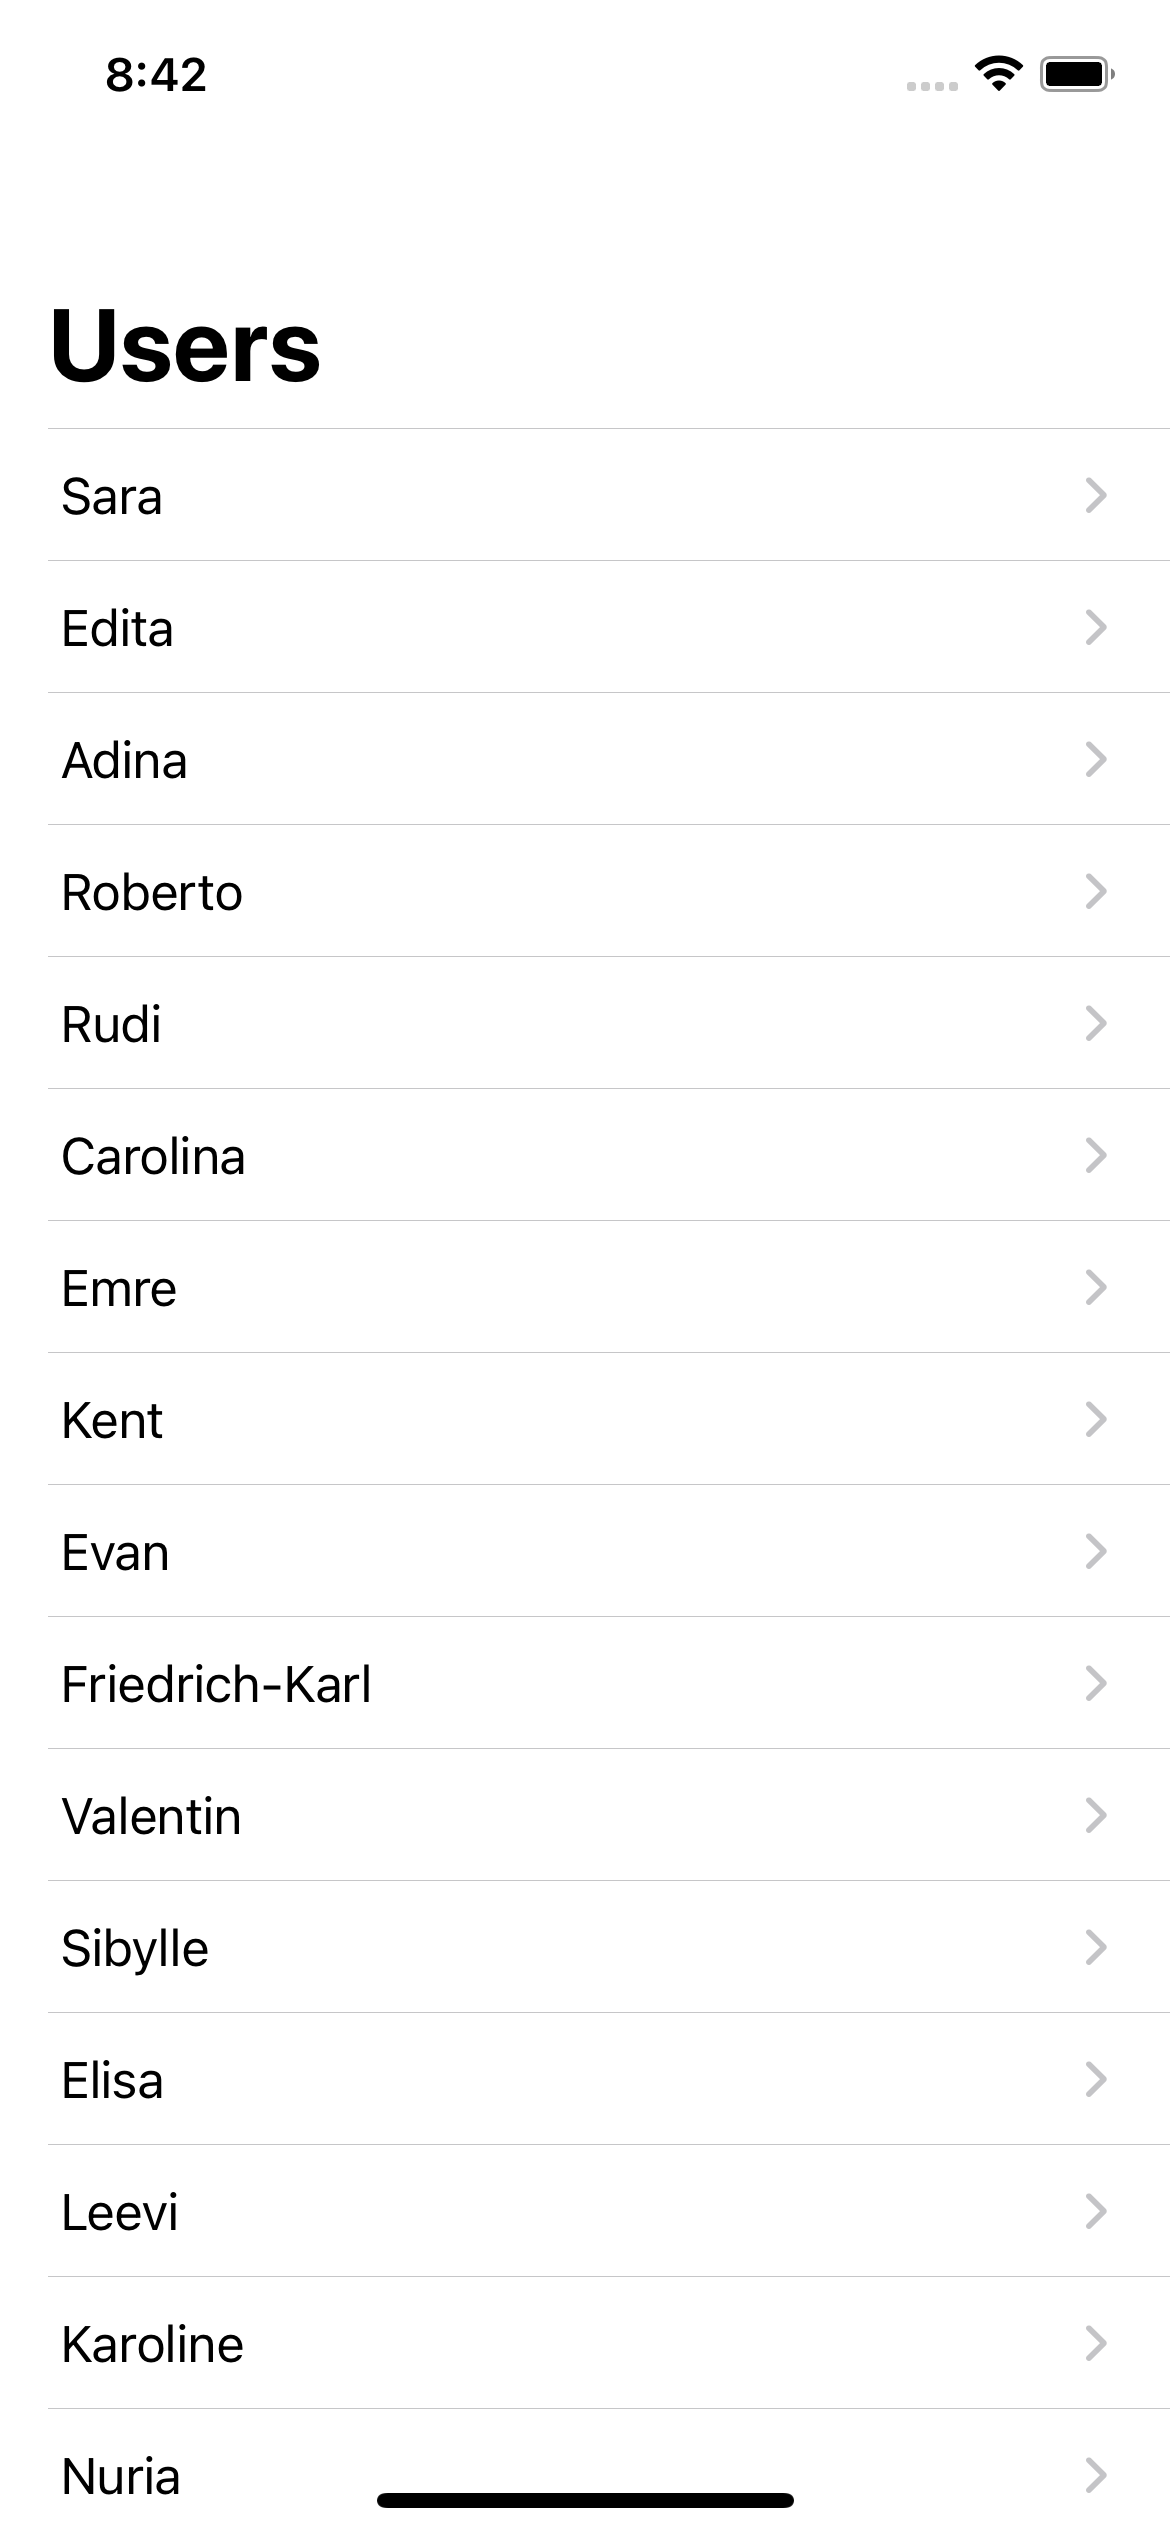
First, we want to create this screen:

Let’s start with a View Model for this screen:
import Foundation
import Combine

class UsersViewModel: ObservableObject {
    // 1
    @Published public var users: Users = Users(data: [])

    // 2
    private var usersService: UsersServiceProtocol
    private var cancellables = Set<AnyCancellable>()

    // 3
    init(users: Users = Users(data: []),
         usersService: UsersServiceProtocol = UsersService()) {

        self.users = users
        self.usersService = usersService
    }

    // 4
    public func onAppear() {
        self.getUsers(count: 40)
    }

    // 5
    private func getUsers(count: Int) {
        usersService.getUsers(count: count)
            .receive(on: DispatchQueue.main)
            .sink { completion in
                switch completion {
                case .failure(let error):
                    print(error)
                case .finished: break
                }
            } receiveValue: { [weak self] users in
                self?.users = users
            }
            .store(in: &cancellables)
    }
}
- We have a
Publishedproperty that ourViewwill use to render an array of users. - We have a dependency on the
UsersServiceProtocol, a business logic component. By depending on the protocol rather than a concrete class, we achieve dependency inversion. This allows us to supply theUsersViewModelwith a fake service when needed. We will call the service’sgetUsers(count:Int)method and bind the result to theusersproperty defined in the first step. We also add thecancellablesproperty to store future subscriptions. - In case we want to have initial
Usersdata, the initializer has a property for that. We can also inject aUsersServiceProtocol-conforming class. By default, it will be theUsersService. - We will run the
onAppear()method in ourView.Viewdoesn’t know what will happen when it’s run. Behind the scenes, theUsersViewModelwill fetch users and update thePublishedproperty. As a result, the UI update will be triggered and we will see a list of users displayed on the screen. - Here, we have a private
getUsers(count: Int)method that is run once theViewtriggers theonAppear()method.
Now we can create the actual UsersView that will display the users:
import SwiftUI

struct UsersView: View {

    // 1
    @ObservedObject var viewModel: UsersViewModel

    var body: some View {
        // 2
        NavigationView {
            // 3
            List(viewModel.users.data) { user in

                // 4
                NavigationLink(
                    destination: UsersRouter.destinationForTappedUser(
                        user: user)
                ) {
                    Text(user.firstName)
                }

            }.navigationTitle("Users")
        }.onAppear(perform: {
            // 5
            viewModel.onAppear()
        })
    }
}

struct UsersView_Previews: PreviewProvider {
    static var previews: some View {
        UsersView(viewModel: UsersViewModel())
    }
}
- We provide the dependency on the
UsersViewModel. - We add a NavigationView with the title “Users”
- Inside the NavigationView, we display a list having the view model’s users property as its data.
- We display a Text showing a user’s first name. It’s embedded in a
NavigationLinkto allow the navigation to theUserDetailView, which we will define later. Note that theUsersRouterprovides the destination for this particular action. - Once the
NavigationViewappears, we signal toUsersViewModel. Behind the scenes, the view model will fetch users.
With View and View Model done, now we can define the remaining components: Configurator and Router.
The UsersConfigurator looks simple. It provides the UsersView with the UsersViewModel and returns it:
import Foundation

final class UsersConfigurator {

    public static func configureUsersView(
        with viewModel: UsersViewModel = UsersViewModel()
    ) -> UsersView {

        let usersView = UsersView(viewModel: viewModel)
        return usersView
    }
}
We use it in the UsersApp to set the initial View for the window:
import SwiftUI

@main
struct UsersApp: App {

    var body: some Scene {
        WindowGroup {
            UsersConfigurator.configureUsersView()
        }
    }
}
Now let’s add the UsersRouter, which is responsible for navigating to the UserDetail screen:
import SwiftUI

final class UsersRouter {

    public static func destinationForTappedUser(user: User) -> some View {
        return UserDetailConfigurator.configureUserDetailView(with: user)
    }
}
If you remember, we called this method inside the NavigationLink of the UsersView to obtain the destination View. Inside the method, we call the UserDetailConfigurator’s method for creating UserDetailView with a provided User object. We will define the UserDetailConfigurator and the UserDetailView soon.
Great! The Users module is finished. Now we can create the UserDetail one.
The User Detail module displays this simple screen:

We start with a UserDetailViewModel:
import UIKit
import Combine

class UserDetailViewModel: ObservableObject {
    // 1
    @Published public var avatar: UIImage = UIImage()

    // 2
    public let user: User

    // 3
    private var userPictureService: UserPictureServiceProtocol
    private var cancellables = Set<AnyCancellable>()

    init(user: User,
         userPictureService: UserPictureServiceProtocol = UserPictureService()) {

        self.user = user
        self.userPictureService = userPictureService
    }

    // 4
    public func onAppear() {
        getAvatarData()
    }

    // 5
    private func getAvatarData() {
        guard let pictureUrlString = user.picture else {
            print("URL doesn't exist")
            return
        }

        userPictureService.getUserAvatarData(urlString: pictureUrlString)
            .receive(on: DispatchQueue.main)
            .sink { completion in
                switch completion {
                case .failure(let error): print(error)
                case .finished: break
                }
            } receiveValue: { [weak self] data in
                guard let image = UIImage(data: data) else { return }
                self?.avatar = image
            }
            .store(in: &cancellables)
    }
}
- Just like in
UsersViewModel, we also have aPublishedproperty that ourUserDetailViewwill use to render an image on the screen. - We have a dependency on the
Userobject that was selected in theUsersView. - Similarly, we have a
UserPictureServiceProtocoldependency and the cancellables property. We will use the service to fetch a picture of the user. - This time, the
onAppear()method triggers an image-loading operation under the hood. - The private
getAvatarData()method obtains aUIImageand binds it to thePublishedproperty defined earlier. As a result, theUserDetailViewis updated with the user’s image.
We implement the UserDetailView as follows:
import SwiftUI
import Combine

struct UserDetailView: View {
    // 1
    @ObservedObject var viewModel: UserDetailViewModel

    let screenWidth = UIScreen.main.bounds.width

    // 2
    @State private var showingModalSheet = false

    var body: some View {
        // 3
        VStack {
            // 4
            Image(uiImage: viewModel.avatar)
                .resizable()
                .aspectRatio(contentMode: .fit)
                .frame(width: screenWidth * 0.2,
                       height: screenWidth * 0.2,
                       alignment: .center)
                .clipShape(Circle())
                .shadow(radius: 10)
                .overlay(Circle().stroke(Color.blue, lineWidth: 3))
                .padding()

            // 5
            HStack {
                Text(viewModel.user.firstName)
                Text(viewModel.user.lastName)
            }

            // 6
            Button(action: {

                // 7
                showingModalSheet.toggle()
            }) {

                Text("Get more info")
                    .padding()
                    .frame(width: screenWidth * 0.6)
                    .foregroundColor(Color.white)
                    .background(Color.blue)
                    .cornerRadius(16)
            }
            .sheet(isPresented: $showingModalSheet, content: {
                // 8
                UserDetailRouter.destinationForMoreInfoAction(user: viewModel.user)
            })
            .padding(.top, 20)
            Spacer()
        }
        .navigationTitle(viewModel.user.firstName)
        .onAppear(perform: {
            // 9
            self.viewModel.onAppear()
        })
    }
}

struct UserDetailView_Previews: PreviewProvider {
    static var previews: some View {
        UserDetailView(
            viewModel: UserDetailViewModel(
                user: User.fake()
            )
        )
    }
}
- Similarly to the
UsersView, we have a dependency on theUserDetailViewModel. - We add a State property that we will later use to show a modal sheet on the screen containing more info about the user.
- We add a
VStackto display content in a vertical line. - The
Imageview is bound to a Published property of the UserDetailViewModel. Once aUIImageis obtained, it is displayed in theImageview. - An
HStackis added to display the user’s first name and last name. - We add a “Get more info” button. Tapping on it will present a modal sheet containing more information about the user.
- When we tap on it, the stateful showingModalSheet property toggles, which results in a sheet being shown in step 8.
- Similarly to how we did in the UsersView, we refer to the
UserDetailRouterto obtain the destinationViewfor a button tap action performed by the user. - When the
VStackabove appears on the screen, we signal to theUserDetailViewto start its work.
The UserDetailConfigurator is as simple as the UsersConfigurator defined earlier:
import Foundation

final class UserDetailConfigurator {

    public static func configureUserDetailView(
        with user: User)
    -> UserDetailView {

        let userDetailView = UserDetailView(
            viewModel: UserDetailViewModel(user: user)
        )
        return userDetailView
    }
}
If you remember, the configureUserDetailView() method was called in the UsersRouter when we needed to navigate to the UserDetailView and a NavigationLink required a destination View.
The UserDetailRouter is responsible for providing the destination View when a user taps on the “Get more info” button:
import SwiftUI

final class UserDetailRouter {

    public static func destinationForMoreInfoAction(user: User) -> some View {
        return MoreInfoConfigurator.configureMoreInfoView(with: user)
    }
}
This method was called inside the UserDetailView’s .sheet(isPresented:content:) method.
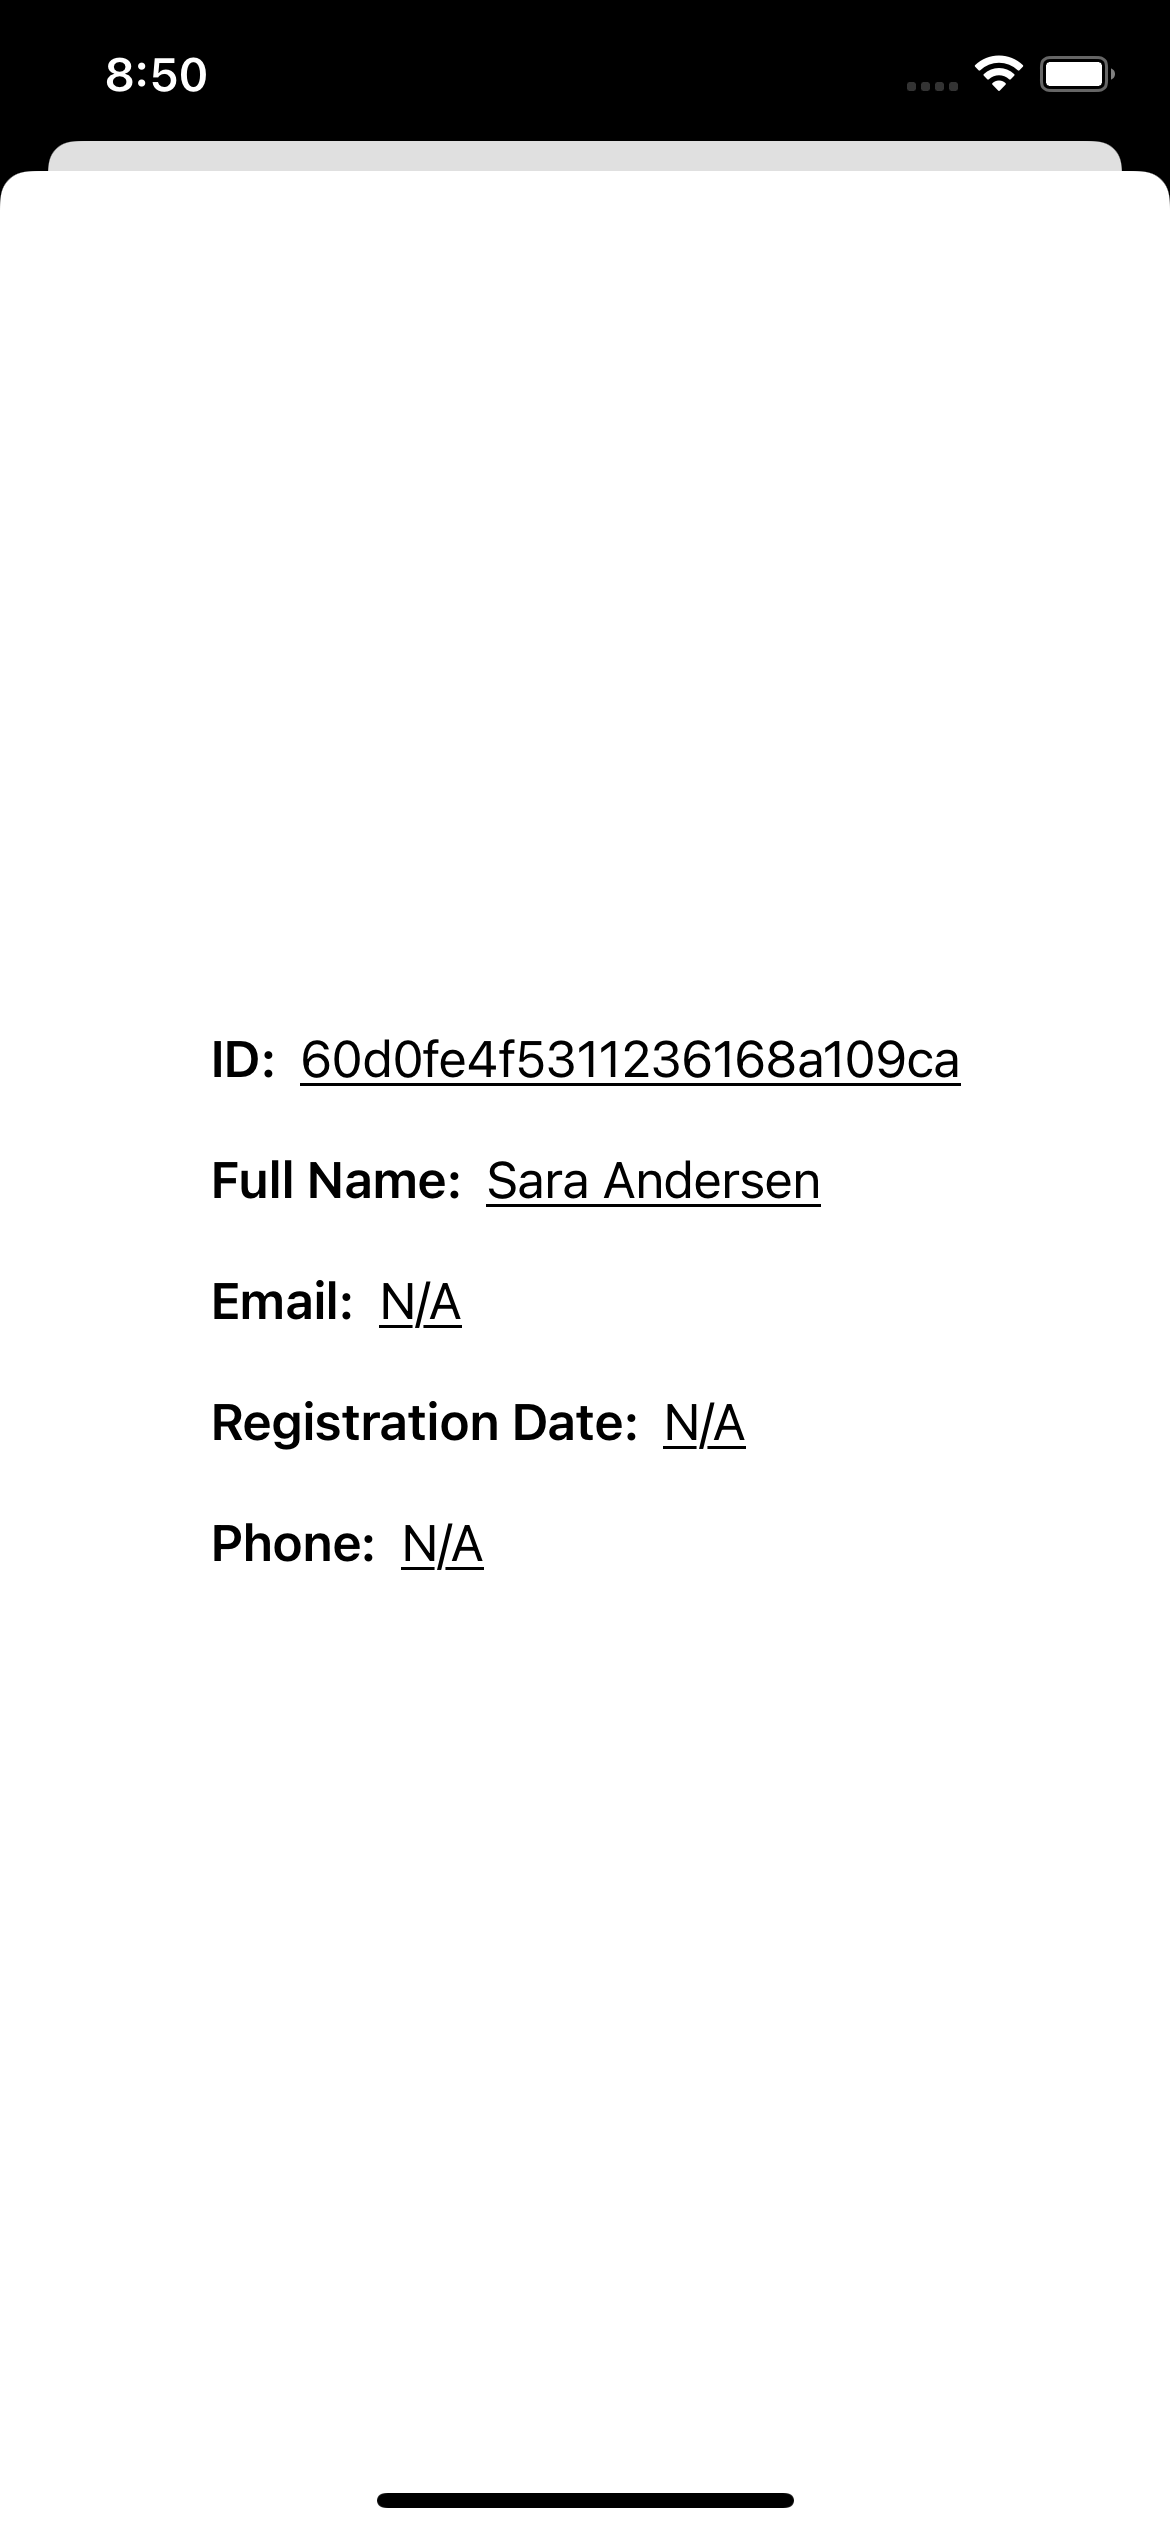
Now the final screen — the modal sheet — is all that remains. I have provided it to show how we can perform modal presentation:

The MoreInfoViewModel simply depends on the User object:
import Foundation

final class MoreInfoViewModel {

    let user: User

    init(user: User) {
        self.user = user
    }
}
Inside the MoreInfoView, we have nothing new. It looks very simple:
import SwiftUI

struct MoreInfoView: View {

    let viewModel: MoreInfoViewModel

    var body: some View {
        VStack(alignment: .leading, spacing: 20) {
            HStack {
                Text("ID:").bold()
                Text("\(viewModel.user.id ?? "N/A")").underline()
            }
            HStack {
                Text("Full Name:").bold()
                Text("\(viewModel.user.firstName) \(viewModel.user.lastName)").underline()
            }
            HStack {
                Text("Email:").bold()
                Text("\(viewModel.user.email ?? "N/A")").underline()
            }
            HStack {
                Text("Registration Date:").bold()
                Text("\(viewModel.user.registerDate ?? "N/A")").underline()
            }
            HStack {
                Text("Phone:").bold()
                Text("\(viewModel.user.phone ?? "N/A")").underline()
            }
        }
    }
}

struct MoreInfoView_Previews: PreviewProvider {
    static var previews: some View {
        MoreInfoView(
            viewModel: MoreInfoViewModel(
                user: User.fake()
            )
        )
    }
}
All we do here is display four Text views inside a VStack.
MoreInfoConfigurator configures the module using the provided User object:
import Foundation

final class MoreInfoConfigurator {

    static func configureMoreInfoView(with user: User) -> MoreInfoView {
        let viewModel = MoreInfoViewModel(user: user)
        return MoreInfoView(viewModel: viewModel)
    }
}
This particular module doesn’t navigate anywhere, so we don’t have a Router here.
Wrapping Up
Great! We have created an app using a clean MVVM approach. We also added the Configurator and Router components to keep the module creation and navigation tasks out of the View. If we had more destination points inside the UserView and UserDetailView, like in real project cases, the Router classes would be larger. Likewise, if we needed more dependencies to construct a certain module, the Configurator component would contain more logic.